
A Simple Little Pouch Tutorial
February 25, 2016 § 29 Comments

Hello, lovely people. I recently gave a demo at my local quilt shop on how to make this little pouch . Here it is for you to enjoy. I made the first one back in December and then gave it away as a gift. That yellow fabric was SO lovely, but it was a clearance fat quarter and I haven’t found any more elsewhere. Granted, I haven’t looked all that hard either.
The inspiration started with a photo I saw on Pinterest. I just really liked the shape. So I started playing around with a piece of paper until I found a size that I liked. You can do the same and make this pouch bigger or smaller. If you make it smaller, though, you will need to either find a smaller zipper or cut down a bigger zipper. I used the 14″ zippers that are sold in my local quilt shop.
With that, let’s get started. You will need 3 different fabrics, one for the outside, one for the lining and one for the binding, and a 14″ zipper to match.

- Cut the outside fabric approximately 11” x 13”. You can go a tiny bit smaller and still use a 14″ zipper but not much more than an inch smaller. After that you will need to find a smaller zipper.
- Cut batting a little bit bigger than the outside fabric.
- Cut lining fabric the same size as the batting.
- Quilt as desired. I used a walking foot to quilt the pouch. You may also have an even feed feature on your machine.
- I quilted mine with vertical lines 1” apart and parallel to the shorter edge and then diagonal lines to make a diamond pattern all over the bag. I like to use my Hera Marker to mark where I want to sew.
- Trim the rectangle to square it up. But don’t trim it much smaller than 10 1/2” x 12 1/2”, otherwise you may need a smaller zipper.

- Using a fabric marker of choice, mark a 6” diameter curve on each corner of the rectangle. This just happened to be the size of my cereal bowl. But you can use a pencil with string or a compass. You may even consider making the curve from a piece of template plastic if you want to make a lot of pouches. Then you will always have it on hand.

- Cut along the marked corners to make the corners rounded.

- Cut a 2 1/2” x Width-of-Fabric stripe for the binding. Press in half lengthwise. If you are cutting from a fat quarter, you will need two 2 1/2″ strips, one for each side of the pouch.
- Start sewing the binding to the quilted pouch rectangle in the middle of the short end and on the lining side. No need to finish the starting edges because this will eventually be cut off.

- Sew the binding to the lining side, fold over, and stitch it down to the outside of the pouch. I stitched the binding entirely by machine.
- If you would prefer to hand sew the binding, then start by sewing the binding to the outside of the pouch and hand sew to the lining side.

- Mark the centers of the long edges with a pin or a marking pencil as well as the center of the zipper.

- Pin the zipper to the pouch.
- Make sure that the distance between the end of the zipper and the center of the pouch side is the same on each side. You may need to repin to make them nearly the same.
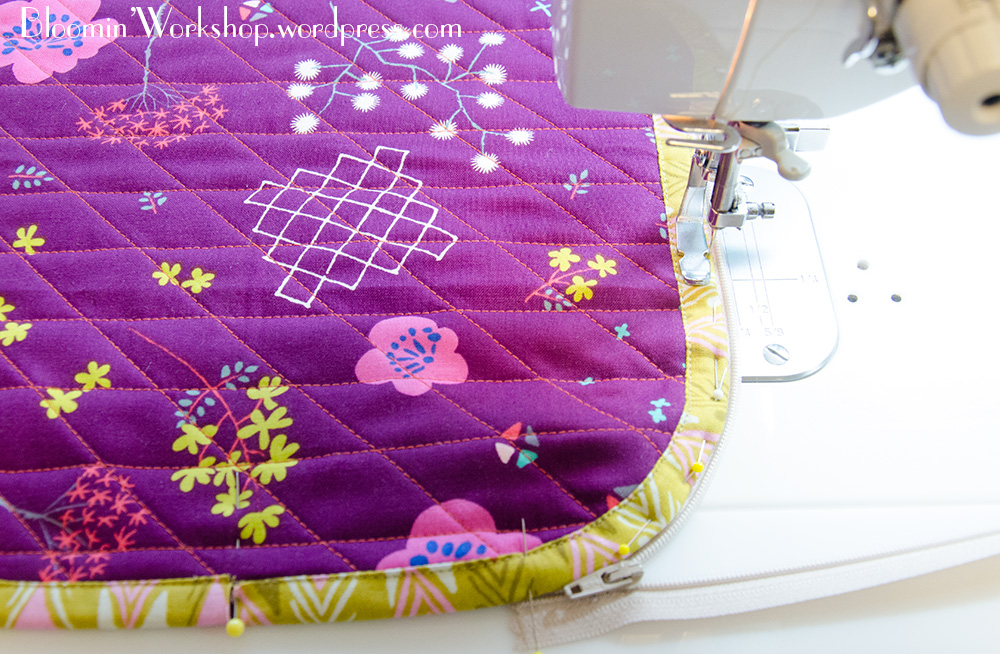
- Sew one half of the zipper to the pouch, matching the center of the pouch with the center of the zipper. Be sure to use a zipper foot so that you can stitch close the the edge of the binding.
- Starting in the center of the short end, topstitch the binding, then continue stitching to secure the zipper to the pouch. Stop sewing when you have reached the center of the other short end.

- Repeat by pinning the other half of the zipper to the other side of the pouch, matching the center marks of the pouch and the zipper.
- Make sure that the ends of the zipper on the second half meet at the same place as the first half. You may need to repin and ease the zipper around to get it to match the first half.

- Start in the center of the short end where you previously ended and topstitch the binding and then sew over the zipper to secure it to the pouch, ending at the end of the other short side where the stitching started.
- This is probably the most challenging part of the bag. It can be a little tricky trying to squeeze your presser foot into that tight corner. You don’t need to start in the exact center. You probably have about an inch of leeway to adjust your starting point. That little corner will eventually be cut away.

- Fold in the ends of the pouch to make a pleated bottom. Mark a 3” line across the fold with a permanent marker or temporary pencil. This will be your stitching line. Mark the other end of the pouch in the same way.
- Stitch along the marked line on each side, then cut away the corners, leaving a 1/4″ seam allowance.

- Cut two 4” x 2 1/2” pieces of binding from the lining fabric.
- Fold each one in half and press. You will use these to cover the cut corner edges inside the pouch.

- Sew the binding to each corner. Fold the ends in and then fold over the binding. Pin in place and sew it down. This makes the inside so neat and tidy.

- Where there is a hole between the zipper and the corner seam, hand stitch the pouch binding together with a ladder stitch. I stitched it twice for extra strength.

This completes your Simple Little Pouch!
You can play with the size, or even adding a wrist strap or small handles to the top. Make it your own!

Wow… the details and your talent are a work of art!! Seriously! My favorite part was the use of your cereal bowl.
********Keep on sewing*******
This is fabulous. If it continues to snow all afternoon I know what I’ll be doing. Thanks. Your colour choices are gorgeous.
Super cute! Thanks for sharing!
Thanks for sharing Anita….this is so cute ! Can’t wait to make one.
I saw that you were doing a demo at Gatherings today and darn, I’m in AZ., so glad to check your sight and see the tutorial pop up! Made one this a.m. already in 1 1/2 hrs. Love making small bags and this one is different then the ones I have been making. Thanks
This is so cute Anita!
Love this! Thank you so much for sharing the tutorial – Lots of great pictures!
This is so cute! I’m sure I saw your first one and loved that one, too. I’ll definitely have to make one of these…or more if my granddaughters see it 🙂
Very sweet! Thanks for sharing the tutorial!
Oh, and thanks for providing the tutorial!
So happy to see your tutorial for this sweet little pouch :o) I’m looking forward to giving it a go – now to hunt for just the right fabrics. I believe I’ll have to shop for a zipper as I don’t usually stock any. Thanks for sharing Anita!
I love it! I need to make a little one. My big one got it’s finishing touches a few minutes ago 🙂
Cute! I’m going to have to make at least one of these.
So so cute!
Lovely tutorial! So good of you to share your efficient techniques! I learned a useful tip from a Japanese YouTube tutorial. Instead of hand sewing that section between the zipper ends and the boxed corners, you can turn the bag wrong side out and do a very small machine zigag along the edge of the binding, having the stitches catch the binding on the left and fall just outside it on the right. Placing the stitches in that way means there’s not really a seam allowance; you’re just catching the edge. When you turn the bag, the stitches will barely be visible. Works great. I always used to hand sew them, but this saves time.
Very cute! and lovely photos!!!
Dso cute can’t wait to make it thank you
Quick question, Anita – with regards to binding the curve, was there no issue using straight cut binding? I would think that a bias cut binding would fit better and be less troublesome when stitching down with a machine? Just wanted to know if I need to take the extra step…
Thanks!
Good question, Stephanie! I cut my binding on the cross-grain and didn’t have any trouble. The cross-grain does have a little bit of stretch. If you are nervous about the binding, then go ahead an make it on the bias. That will give you even more stretch. Some people can make the cross-grain binding work and others have trouble with it, so use your best judgement based on your own experience.
Good luck! Anita
Love the shape of this pouch, I will have to make one for sure! If you do decide to look for more of that yellow and pink binding fabric, it’s from Sarah Watts August line for Cotton and Steel.
This pouch is so cute! I love the shape! I’ve got a Craft Gossip post scheduled for later today that features your tutorial: http://sewing.craftgossip.com/?p=87077 –Anne
[…] A Simple Little Pouch Tutorial, by Bloomin’ Workshop […]
That’s a beautiful pouch! Love it! I’d love to invite you to our craft party to link this post up! We pin every instructional post! http://www.diy-crush.com
Thank you for the tutorial. This is such a cute little bag!
What a great tutorial! Thanks so much.
This is such a beautiful little pouch! I would love to include it in a “Handmade Gifts for Awesome Ladies” tutorial roundup blog post I am writing! I will include a picture from your post and a synopsis of why it is so awesome and why all of my followers/customers should make it, with a link to your amazing tutorial, of course. If you would prefer that I do not include it, please get in touch with me as soon as possible at hello@makermountainfabrics.com
Thank you so much!
Grace
makermountainfabrics.com
Great tutorial, Anita!
Love the fabric you’ve used!
I really need a pencil case so I intend to make one soon.
Thanks for showing us how you made it!
Barbara (of TheFlashingScissors.blogspot.co.uk)
[…] 3 – A Simple Little Pouch Tutorial by Bloomin’ Workshop […]
Hi I had made this pouch and love its use so much I’m making another one
Thank you for the time to make the tutorial