The “Everything in its Place” bag
October 30, 2014 § 14 Comments
When I saw Letty’s Everything In Its Place Bag, I was intrigued. But it was after taking a wool embroidery class together and from the enthusiasm of both Letty & Leslie, who works at the shop where we took the class, that I decided that I needed one for myself.
BTW, the pattern is called A Place For Everything on byAnnie.com. But, it’s called Everything in its Place on Craftsy. Go figure. It’s the one and same Annie who created Soft & Stable. She also sells the zippers in a variety of colors.
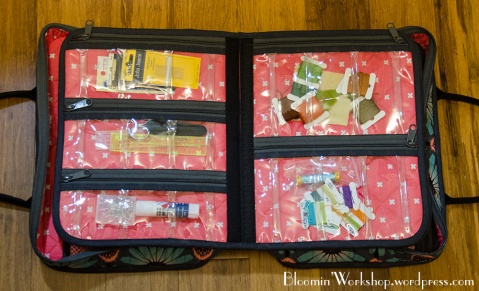
The bag zips open to reveal pages for storing all sorts of things. I’ve put hand sewing & embroidery things in my pockets.
The pockets stack together and stick to one another with strips of velcro.
I love my bag! But let me list the pros & cons for you. I’m glad I made it. But the whole thing is not for the faint of heart.
- It is very labor intensive!
- Sewing on clear vinyl can be tricky.
- The zippers are not cheap. But that’s what makes the bag so great. In comparison to making a quilt, I guess the cost is no big deal. But if I had to pay for the bag already made, I would have balked at the price. I try not to think about how much money I spent on this bag and just enjoy the awesomeness of it.
- I tried to make the package of Zippers by the Yard work for the entire bag, but came up with one page left without zippers. So I made the last page a mesh pocket instead. I am totally fine with that modification.
- The pattern doesn’t have very many diagrams, so it is totally worth the cost of taking the Craftsy class. The class was on sale when I took it.
- I also made some major adjustments to the pattern. After Letty and I discussed the use of the bag, and while I was putting mine together, I decided to make some critical changes to the pattern that would make the whole thing work better for me.
The first thing that I changed was to take the handle off the closed end of the bag. The reasoning behind this was that this is where the velcro holds the bag together. And when the bag is being carried around, essentially, gravity is pulling pages down & putting extra strain on the velcro. It didn’t seem like a long term, efficient, frugal thing to do. So I removed the handle (yes, it was a bear to rip out) and made the top the bottom and the bottom the top.
So, then I purchase some 1 1/2″ nylon webbing and made some handles to sew onto the open end of the bag. Now, when I carry the bag around there isn’t as much strain pulling on the velcro and pulling the bag out of shape. Seems like it might last a little longer this way.
I also had a hard time getting the zipper side panels to fit the body of the bag without puckering at the corners. I eventually cut off a whole inch from the zipper panels to make sure that there were as few puckers around the corners as possible.
I also cut 1/4″ off of each end of each page. When I started stacking up the pages inside the bag, it seemed like the pages then stuck out more. Lying flat they fit in the bag nicely. But folded up, they seemed to push out the zipper panels of the bag body. Besides, this also seemed to place the pleats in the vinyl to be more centered than previously. So it was a win/win decision.
And… after talking about how the zippers were applied to the vinyl, I ended up making 3/4″ bias tape, folded in half, out of my contrast fabric to cover the edge of the vinyl so that I wouldn’t have to fold the vinyl over. This also nicely covered the thread from basting the pleats in the vinyl that would have otherwise been visible.
I love how it turned out!! And now I can grab my bag and take everything I need for embroidery & stitching projects without having to dig around my sewing room to locate it all. Yay!
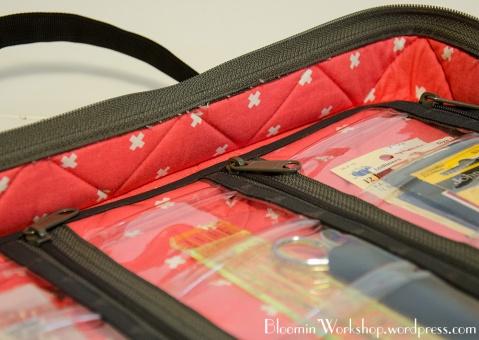
The only thing I wish I had done differently was to somehow finish the edge of the fabric that is under the zipper panels. Can you see the little threads fraying out? I need to go pick up some Fray Check to prevent them from fraying more.
My week of UFO sewing is going well. But it’s going by WAY too fast. I’ve been working on 3 different UFO’s. One is a year old. Another is 5 years old. And the last one is 10 years old. It’s time to finish these babies, don’t you think?


in love with this! especially since we travel so much!
Can you or Letty make me one? That’s a cool bag! It would be perfect for all my tools!
Two posts in one week, impressive just like this BAG!
Wow, lots of detail and creative changes that you made.
Sometimes being open to changes, the outcome is so much better.
(Hummm…I’m talking about the bag but then again, it could be life!)
Well, done my friend. Your efforts shine.
Very handsome bag. And the changes make sense to me. I agree on the handle location too, and I am most impressed with the piped finish. I have a beautiful tote bag that needs the same thing done with the Ultrasuede that I chose to use, but it is so bulky, I can’t get it under the machine foot.
gosh thats gorgeous and boy would i never make one!! what is the fabric, i know ive seen it but cant remember the maker
Wow Anita! What a wonderful bag this is…I bet you will just love using it :o) I like the fabrics you chose to use. I’ve seen that AMH fabric online, but never really saw anyone doing anything with it. It really looks great for this bag.
Well your bag is the belle of the ball! I LOVE your fabrics so much, and your modifications make it a complete winner. I still love mine, but would definitely do what you did if I’d had it to do over.
You are one clever seamstress!!!
Wow, Anita, well done! I was impressed when I saw Letty’s bag and am equally impressed by yours. I like the adjustments you made to the handle too, seems to make sense. Congrats on another finished project, you’re on a roll 🙂
Love your bag! Also love the coneflower fabric you used. Any chance that you know the fabric name or lone? I’d love to get some like it.
It turned out beautifully, and I’m glad that you are pleased to have made it! If those threads sticking out on the zipper side strips bothers you, you can use a strip of bias tape to cover them up. That’s what I did with my original bag. In all of the other ones since then, I’ve trimmed back the seam allowance a little bit before doing the topstitching that closes the edges. That way it’s all completely encased.
I have signed up for this class on Craftsy. While searching for materials I came across your post on the bag. I absolutely love the handle modification you made. I was reading your other notes and wondered if serging the edges would stop the fraying around the zipper that you mentioned. Thank you so much for posting this information. Your bag is stunning!
Trying to get up the nerve to start this bag. So glad you shared your ideas. I will be taking advantage of your generosity . Thanks so much. And your bad is stunning!
I love how it turned out, great job!
Want that shape bag for makeup bag.
I don’t need all those extra pockets. Maybe just one or two. Going to look at the place you gave. Thanks for sharing and love the color of your bag.
Judy