Mini Heart block
June 1, 2015 § 6 Comments
June is my month to oversee the block making for my Do.Good.Stitches group. So I am asking my fellow members to make these heart blocks for me. I was inspired by this mini quilt I found on Pinterest.
I intended to make more blocks for this tutorial but my rib has been holding me hostage. It keeps moving around, popping in and out. We (the chiropractor) are hoping that it will settle down by the end of this week. Those pesky muscles need to forget about the previous bicycle trauma and start doing their job! The massage therapist did a fantastic job this morning in aiding my muscle memory. Let’s hope it sticks!
From the heart fabric cut:
- 1 – 4 1/2″ square, cut in half diagonally twice to create 4 quarter-square triangles. You will only use 2 per block.
- 1 – 4″ square, cut in half diagonally once to create 2 half-square triangles.
From the background fabric cut:
- 1 – 4 1/2″ square, cut in half diagonally twice to create 4 quarter-square triangles. You will only use 2 per block.
- 2 – 4″ squares, cut in half diagonally once to create 4 half-square triangles.
All of the measurements are cut slightly larger and then trimmed down in the hope that this will create more uniform results for everyone.
From two of the 4 1/2″ quarter-square triangles of each the heart fabric & the background fabric, sew a left-facing and a right-facing half-square triangle unit. Press the seams open to reduce the bulk.
Place a 4″ background half-square triangle on top of each unit and sew the diagonal seam. As you can can see, the triangle unit with the heart fabric is slightly larger. Don’t worry about this. You will trim the block down to the correct size in the next step. Just make sure that the smaller triangle is centered on top of the larger triangle. Press the seams open to reduce the bulk.
With a square ruler or square up ruler or any ruler that gives you the appropriate diagonal line and inch measurements, trim both blocks to 3 1/2″ square. Be sure that the 45-degree line that marks the center of the half-square triangle is placed on top of the diagonal seam line so that the heart portion is also centered.
Here is a closer view in hopes that you can see what I am talking about.
With the remaining 4″ half-square triangles, sew a background fabric to a heart fabric and press the seams open. Trim these blocks to 3 1/2″ as well, again, placing that 45-degree line on your ruler directly on top of the seam line so that the block is centered.
Another close-up of the half-square triangles so that you can see what I’m talking about.
Arrange the half-square triangles as shown to create a heart motif. Sew the squares together in each row, pressing the seams in alternating directions. Then sew the rows together to complete the block, nesting the opposing seams in the center to aid in matching the triangle points.
Voila! Your finished block should measure 6 1/2″ square including the seam allowances. If anyone has any questions, please let me know.
If you are making these for our Do.Good.Stitches group, repeat these instructions to make 6 blocks total. There are additional details about the blocks, fabrics, etc in our discussion thread for the month of June. Thank you!
Castle Blocks
July 30, 2014 § 4 Comments
August is my month to organize, gather blocks & create a quilt for the Faith Circle of Do.Good. Stitches. We make quilts and send them to Restore Innocence, an organization that rescues girls from human trafficking. I am asking my fellow block makers to make this Castle Block for me.
I would venture to guess that at least 90% of my scraps are strips and strings leftover from previous projects. I have three large bins and 2 small bins of these kinds of scraps. So I am always looking for ways to use these up. Once I made three quilts to give to three couples that we hang out with regularly. They were the 3 Amigo quilts. Even three quilts didn’t seem to make much of a dent in the scraps! I also have a couple of projects in the works. The Liberated Wedding Ring and the Liberated Log Cabin. I just wish I had more time because I *swear* that the scraps breed like bunnies while I’m not looking!
When I ran across this interesting block that was created for Downton Abbey fans by Michelle Freedman over at Generation Q magazine, it seemed like a good idea for our Do.Good.Stitches group. And…. maybe I could use up some of my overflowing string scraps. We make 12 1/2″ blocks in our group, but I wanted just one cross per block. So, here’s my version of Melissa’s block.
1. Gather together enough scraps to make two 4 1/2″ squares and one 4 1/2″ x 12 1/2″ rectangle. Sew the scraps together and press the seams open. Trim to make two 4 1/2″ squares and one 4 1/2″ x 12 1/2″ rectangle.
2. From a variety of background fabrics cut four 4 1/2″ squares and eight 2 1/2″ squares.
3. With a pencil, mark the diagonal on the wrong side of the 2 1/2″ square background fabrics. Place one in the corner of a scrappy 4 1/2″ square and sew on the marked diagonal. Trim away the corner leaving a 1/4″ seam allowance. Repeat to the adjacent corner. Do the same to the second scrappy 4 1/2″ square. Press the seams towards the corners.
4. Repeat sewing & trimming a 2 1/2″ background square to each corner of the scrappy 4 1/2″ x 12 1/2″ rectangle.
5. Place the scrappy 4 1/2″ squares perpendicular to the 4 1/2″ x 12 1/2″ rectangle. Place the 4 1/2″ background squares in the corners and sew to each side of the scrappy square in the middle. Press the seams towards the corners.
6. Sew the rows together to complete the block. Press the seams towards the center of the block.
Would you like to see the back?
If you are part of my Do.Good.Stitches group, then proceed to making another one. Please? Thank you! If you just want to practice your 1/4-inch seams, then make as many as you like!
Can you believe that August is just around the corner? My summer is going WAY. too. fast.
Asteria block 1
October 11, 2013 § 6 Comments
Taken with my iPhone. Notice how the Pippa fabric is reflecting off of my phone onto the top of my sewing machine. Weird. What if we could buy pretty fabric-like printed sewing machines? That would be cool.
Mod blocks & using scraps
June 18, 2012 § 11 Comments
One of the reason I enjoy being in a virtual quilting bee on Flickr is because I get to try out new techniques that I wouldn’t ordinarily do for myself without having to make an entire quilt. These blocks were made using the Mod Mosaic Block tutorial over on Elizabeth Hartman’s blog Oh, Fransson! These blocks remind me of the art by Modrian.
These blocks aren’t something I would normally give a try. Mainly because it feels like I’m wasting fabrics. Which I’m not. Not really. Because they all came from my scrap bins (Except for the light purple fabric with hearts… which was lost in my stash & I didn’t even know I had!). Normal people would probably throw out these little bits anyway, but I can’t seem to throw out anything but the smallest shred of a piece. Hence the reason my scrap bins are overflowing! It must be one of my psychological hang ups.
And a secondary reason that sometimes prevents me from doing more free-piecing is that often it doesn’t feel relaxing to me. It’s not that I don’t enjoy it. It’s just that I have to be in the right frame of mind to sew like this. Sometimes I want the challenge of trying to make all the pieces fit together. But more often I enjoy the repetitive, almost therapeutic motion of just sitting at the sewing machine and chain piecing. These blocks require a lot of get up to cut, sit down & sew, get up to iron, sit down to sew. Maybe that sounds lazy? There are certainly different reasons for choosing different types of quilting patterns or techniques.
The other thing these blocks did for me… is make me realize what a messy storage solution I have for all my scraps! They would be so much more useable if they were all pressed and stored flat rather than stuffed willy nilly into buckets. Like I have enough free time to iron them all, reorganize and store differently. Ha! Maybe someday they will be better organized and user ready…
(This was quite awhile ago when they were relatively neatly organized. It is much worse now!)
How to draft a LeMoyne Star
September 1, 2011 § 21 Comments
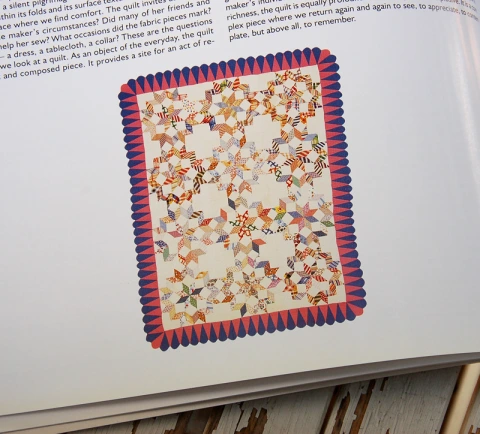
Remember this quilt from this post?
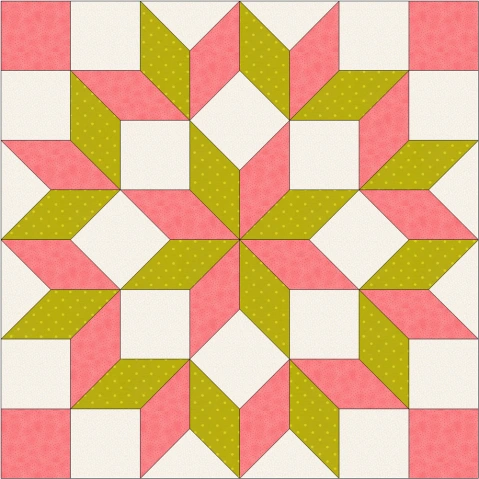
Wanna learn how to draft a LeMoyne Star quilt block? (it’s the center star in this block) Okay then… follow me. Otherwise, click away to a more chatty and entertaining post.
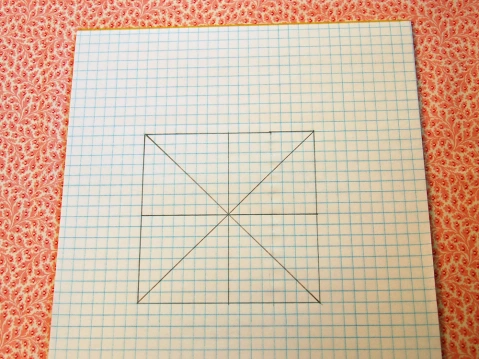
1. Draw a square and divide it in half horizontally, vertically and diagonally. A LeMoyne Star is an 8-pointed star.
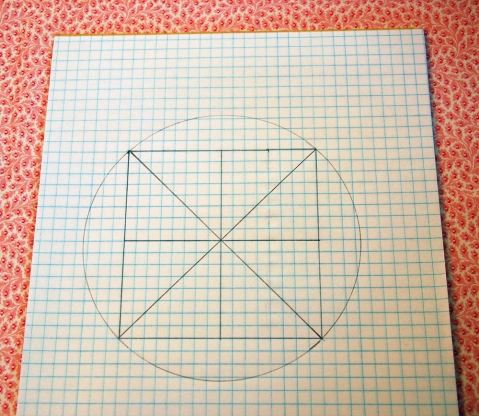
2. Using your protractor, or two pencils with a string between them, draw a circle around your block.
3. Extend the middle horizontal & vertical lines and draw a secondary square.
4. Notice the points (the red dots) where the two squares intersect. These will be the points of the Lemoyne Star.
5. Draw vertical lines & horizontal lines from those intersections that are parallel to the sides of the first square. This creates the diamond shapes in the LeMoyne Star. Color in the sections so that you can see the diamond shapes.
6. So… how big do you want your star to be? Well, the ol’ trusty Pythagorean Theorem will help us. Not a math person? Me neither! I only know the math required to make quilt blocks. Please don’t ask me about any other kind of math. If it’s not required to make a quilt, I won’t know it.
You will need a scientific calculator to figure this out. If you don’t have one, you can use this Pythagorean Theorem Calculator on the Internet.
The Pythagorean Theorem works on right triangles. Right triangles are those that have one 90º angle. You can see the triangle marked in red in the photo above. If you know the measurement of one of the sides of the triangle you can figure out the others. The formula is a² + b² = c².
I want to make a giant one block quilt and so I’ve worked out the size on EQ already. I’m really working backwards at this point. I have decided that I want to strip cut the diamonds and I want the measurements for the diamonds to be nice round numbers. So, I’ve arbitrarily decided that I will cut 7″ strips that will give me a finished measurement of 6 1/2″ – which is the measurement of “a” on the diagram above. So my a = 6.5″ and my b=6.5″.
What I want to know is the measurement of “c”. Plugging in the numbers 6.5² + 6.5² = 9.19². Each side of the diamond is the same size at 9.19″. So if I add 6.5″ + 9.19″ (for the dimension of half of the square) x 2 (for the full dimension of the square)… my block will measure 31.38″ or 31 3/8″. Add a 1/2″ to everything to include the seam allowances.
Do you know the common decimal conversions of the fractions for quilting? Here they are just in case:
- 1/8 = .125
- 1/4 = .25
- 1/3 = .33
- 3/8 = .375
- 1/2 = .5
- 5/8 = .625
- 2/3 = .67
- 3/4 = .75
- 7/8 = .875
If I make just this one block as an entire quilt top and strip cut the diamonds at 7″, my quilt should measure approximately 63″ when it is finished.
If you like drafting your own blocks, you may be interested in the book Drafting for the Creative Quilter. You can see a preview of the book over at Google Books and then download it to your eReader.
It’s not like I need to start more projects or anything… but this block has been tormenting me in the back of my mind. And… maybe it will give you something to think about over our long Labor Day weekend here in the U.S. If you don’t have a long weekend, don’t worry. I’m going to come back to this at a later date when I get some of my “have-to” sewing done.
Happy early weekend!


