A Square Bag
November 20, 2008 § 25 Comments

Earlier this week I had some time to try and recreate the original Trick or Treat bag. It mostly came out the same. The handles are a little different, but easy enough to change. And I think I poked and molded the first one so it looked more square. With a little poking and shaping on the second one, it would look more square as well.
This is a very photo heavy post. Sorry! Here’s what I think I did, roughly:
Finished measurements: 6″ x 6″ x 9″
Yardage requirements:
Base – 1/4 yard
Bag & Handles – 1/3 yard
Lining – 1/3 yard
Fusible fleece- 1/2 yard (I used Pellon Fusible Fleece 987F)
1. From the contrasting base fabric, cut (1) 7″ x 7″ square and (2) 3″ x 13″ rectangles for the bag bottom.
2. From the bag fabric, cut (2) 7 1/2″ x 13″ rectangles for the sides of the bag and (2) 3″ x 14″ rectangles for the handles.
From the fusible fleece, cut (1) 7″ x 7″ square for the bag bottom, (2) 10″ x 13″ rectangles for the bag, and (2) 1″ x 14″ rectangles for the handles.
From the lining fabric, cut (1) 7″ x 7″ square and (2) 9 7/8″ x 13″ rectangles.
3. Using 1/4″ seams, sew the 7 1/2″ x 13″ bag top pieces to the 3″ x 13″ bag bottom pieces. Press the seams towards the bottom. The finished size should be 10″ x 13″.
4. Iron the fusible fleece to the wrong side of the 10″ x 13″ bag pieces and 7″ x 7″ bag bottom.
5. Topstitch 1/4″ along the bottom seam of the bag on the contrasting bottom fabric.
6. Place the two bag body pieces with right sides together, sew a 1/2″ seams on each of the two sides. Press the seams open. With a pin, mark the center of each of the pieces.
7. Iron the fusible web to the wrong side of the 7″ x 7″ square bag bottom. Place pins to mark the center of each of the sides.
8. With right sides together, pin the bag bottom to the bag body, matching each of the pins in the bottom to the two seams and 2 pins in the bag body.
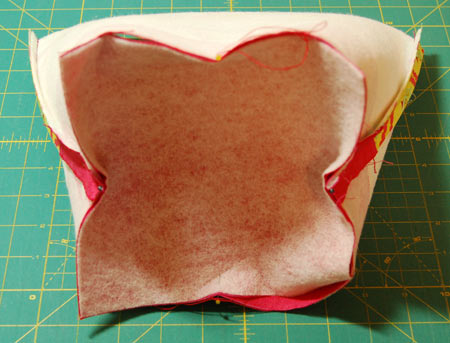
9. Continue pinning around the bottom of the bag, clipping the bag bottom about 3/8″ in at the corners to help them lay more flat.
10. Sew each of the four sides of the bag bottom with a 1/2″ seam, starting at one corner and stopping at the next corner. Be sure to back stitch to secure the corners.
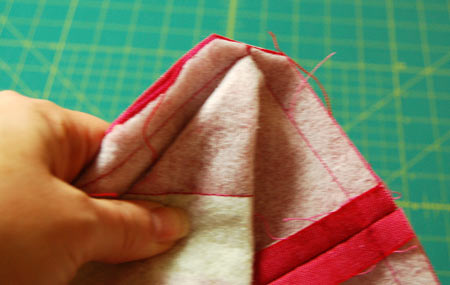
11. Trim the bottom corners to help them lay more flat.
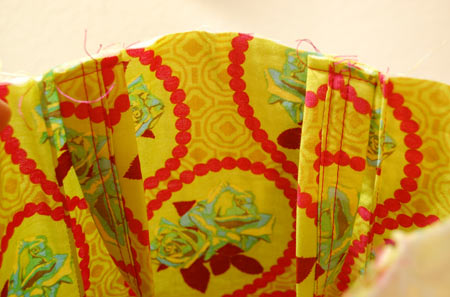
12. Turn the bag right side out. Flatten the bag at one corner and pin. The distance between the side seam and the corner should be approximately 3″.
13. Topstitch 1/8″ inch along the edge of the bag to create the look of a crease. Repeat these last 2 steps for each of the four bag corners.
14. Now it’s time for the handles. Iron a 1″ x 14″ fusible fleece piece roughly in the center of each of the 3″ x 14″ handles. I think this is where the difference in the two bags begins. I think the first bag was a little bit off center so that I was able to sew three lines of stitching on the handles. And the second bag was pretty much centered, allowing me only two rows of stitching. The three rows seem to give the handles just a smidge more body. So, if you like stiffer handles, place the fusible fleece a little bit off center.
15. Fold over one side (or the shorter side) and press flat. On the other side, fold over and press a scan 1/4″ to hide the raw edge of the fabric. Then finally fold over the whole piece to cover the fleece in the handles. Pin into place. Sew an 1/8″ from the edge of that 1/4″ fold to secure in place. Add 1 or 2 more lines of topstitching to the handle, depending on how much room you have. My lines of topstitching are about 1/4″ apart.
16. Place the handles about 1/4″ away from the corners of the bag. Be sure to check that the handles aren’t twisted. Also, place the handles on the sides without the seams. Let the seams fall on the sides of the bag. Turn the bag inside out (to make it easier to sew) if you don’t have an open arm on your sewing machine. Baste into place.
17. Repeat steps 6 – 10 to assemble the lining. With right sides together, pin the lining to the bag. Sew a 1/2″ seam around the top of the bag, leaving about a 5″ opening on one side. Turn the bag right side out and press.
18. Slip stitch the opening closed. Then topstitch 3/8″ from the top edge all around the bag.
Viola! It’s a square bag. Now, let me see your square bags!


way to go:) thanks so much!!! love the bag:)
Sooo cute!
Thanks, Anita!! I may have to change my plans for the day! I’m feeling a sudden virus that would prohibit me from doing two hours of levers in the classroom today. It’s a square bag virus. I can’t wait to make some. Oh…must get fusible fleece…
Love the bags and thanks for the pictures — very helpful for this brain that is easily distracted by all the little conversations in my house.
Thank you very much for sharing it. I’ll certainly do it! It’s lovely!
what a great tutorial! both bags looks lovely – but those sharp corners make me nervous! Maybe I’d have to make an “almost” square bag :-0
You are the Tutorial Queen!
Hi find your blog and love the squarebag. I’m gonna try to make one of this.
Asa from a sweden
[…] November 24, 2008 at 10:03 pm · Filed under Fabric Anita wants to see your Square Bags. […]
Just made up a square bag this evening. We’re headed to CA tomorrow and won’t be back until late Saturday. I’ll post pictures sometime within a week. LOVE you’re tutes. They are absolutely the best. With little ones around, yours are so easy to drop whatever I’m doing and come back to.
I love this! I am printing this out now to make my own. Thanks!
Anita, as promised, here is my bag http://simplefancies.blogspot.com/2008/12/hip-to-be-square.html
Thanks again for the tutorial.
Thank you so much for posting these bags. I have made 8 of them, 6 of which were for Christmas gifts. Here’s a pic of the gift ones.
http://farm4.static.flickr.com/3289/3126700569_6b43081eb8.jpg
I had so much fun making them, I made 2 for myself. One I use for a lunch bag and the other I made longer handles and use it for a purse. 🙂
I love your website, and all the darling things you make! Thanks for sharing all the picts and tutorials. Where do you buy the ‘tag’ ribbon that has your name on it? That’s just the crowning glory to your adorable items!
Hi Anita,
Your website is great! Love the pictures to follow to make the square bag. It is so……cute.
Keep up the great ideas.
Linda
Thanks so much for all the pictures! I’m going to try making bags with square bottoms now.
Great tutorial. I was looking for a bag for my knitting. Thanks.
hola anita, te visito desde tampico tam. en mexico, felicidades por el blog y el tutorial intentare hacer una bolsa se me hace practiquisima y bonita en hora buena, un saludo mi nombre es liliana alvarez mendoza
Thank you for the tutorial. It was easy to follow and I’m pleased with the result! Here are some photos:

I’m using the bag to hold gifts and wanted it to be quite ‘boxy’, so as well as the fusible fleece on the bag fabric, I used medium weight interfacing with the lining fabric.
Thanks again 🙂
How did you get your pictures to post here?
Jean, I think the photos need to be hosted on the web somewhere and then you just add a link in the comments. Hope that helps!
Anita
[…] loulous ces jolis paniers pour garder leurs mignardises. Le point de départ pour ce projet était ce tutoriel de petits sacs, que j’ai modifié un peu en y ajoutant des incrustations en forme de l’oeuf en […]
So glad I found this tutorial! Thank you for posting it! I wanted to make a cube lunch bag that would fit the plastic containers I use. I’m no great seamstress, but I’m really pleased with it! I can’t figure out how to post a picture. 😕 Thanks again!
How do I post a pic of the one I made from your tutorial?
Great tutorial! Don’t ever apologize for including lots of pictures! The test of a good instructional is that someone unable to read could complete the project. You passed with flying colors!